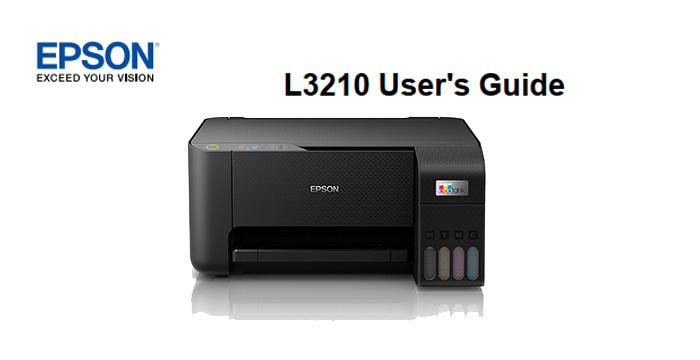
User's Guide for Epson L3210
Product Basics
See these sections to learn about the basic features of your product.
Control Panel Buttons and Lights
Product Parts Locations
The Power Off and Sleep Timers
Control Panel Buttons and Lights
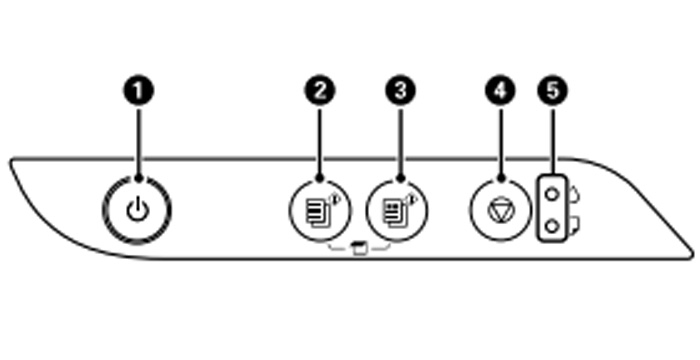
- power button and light
- B&W copy button
- color copy button
- stop button
- ink and paper lights
Product Parts Locations
See these sections to identify the parts on your product.
Product Parts - Front
Product Parts - Inside
Product Parts - Back
Parent topic: Product Basics
Product Parts - Front

- Rear paper feeder
- Paper support
- Edge guides
- Feeder guard
- Output tray
- Paper stopper
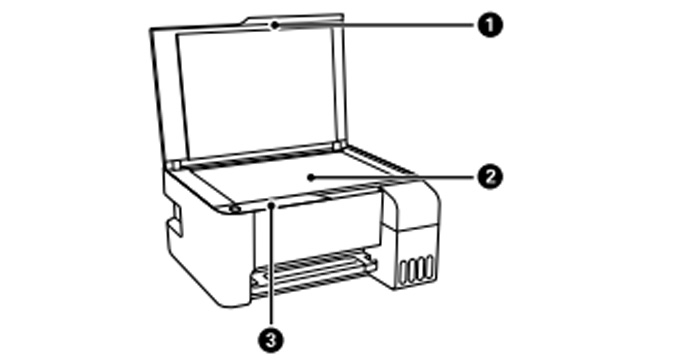
- Document cover
- Scanner glass
- Control panel
.jpg)
- Scanner unit
- Ink tank cap
- Ink tank cover
- Ink tank unit
- Ink tanks
- Front cover
- Scanner unit support
- Print head
Product Parts - Back

1 AC inlet
2 USB port
The Power Off and Sleep Timers
The product enters sleep mode or turns off automatically if it is not used for a period of time. You can
adjust the time period before power management begins, but increasing the time reduces the product's energy efficiency.
Changing the Power Off and Sleep Timer Settings - Windows
Changing the Power Off and Sleep Timer Settings - Mac
Parent topic: Product Basics
Changing the Power Off and Sleep Timer Settings - Windows
You can use the printer software to change the time period before the printer enters sleep mode or turns off automatically.
- Access the Windows Desktop and right-click the icon for your product in the right side of the Windows taskbar, or click the up arrow and right-click . Select Printer Settings and click the Maintenance tab.
- Click the Printer and Option Information button. You see this window:

- Changing the Power Off and Sleep. Note: Your product may have the Power Off Timer feature or Power Off If Inactive and Power Off If Disconnected features depending on the location of purchase.
- Click Send
- Select the time period you want as the Sleep Timer setting.
- Click Send.
- Click OK to close the open program windows.
Changing the Power Off and Sleep Timer Settings - Mac
You can use the printer software to change the time period before the printer enters sleep mode or turns off automatically.
- In the Apple menu or the Dock, select System Preferences. Select Print & Fax, Print & Scan, or Printers & Scanners, select your product, and select Options & Supplies. Select Utility and select Open Printer Utility.
- Select Printer Settings. You see this screen:
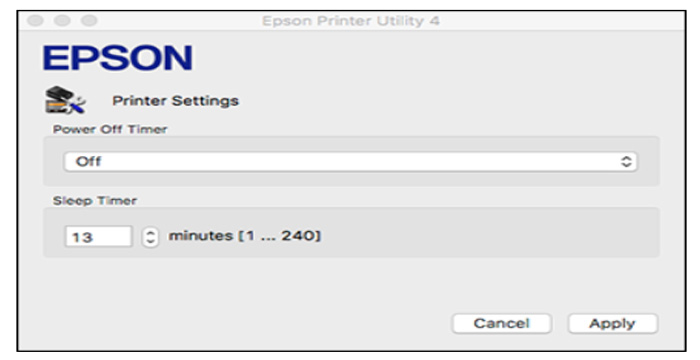
- Select the time period you want as the Power Off Timer setting.
- Select the time period you want as the Sleep Timer setting.
- Click Apply.
- If you see the confirmation message, click Yes, and close the Printer Setting
Loading Paper
Before you print, load paper for the type of printing you will do.
Loading Paper in the Sheet Feeder
Paper Loading Capacity
Double-sided Printing Capacity
Compatible Epson Papers
Borderless Paper Type Compatibility
Paper or Media Type Settings
Loading Paper in the Sheet Feeder
You can print documents and photos on a variety of paper types and sizes.
- Flip the feeder guard forward, then raise the paper support.

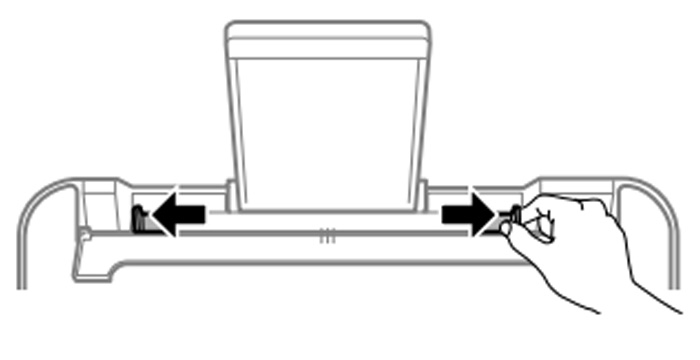
- Slide the edge guides out all the way
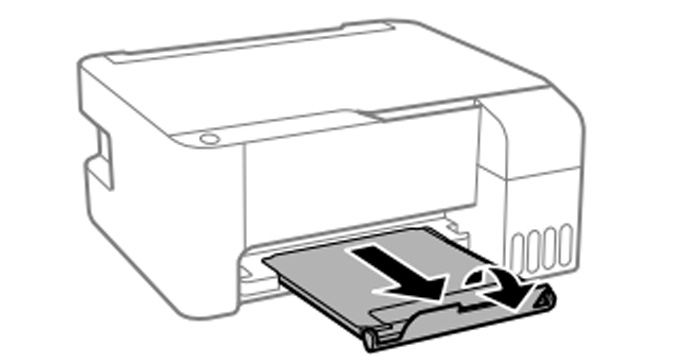
- Pull out the output tray and open the paper stopper.
- If you are inserting a stack of paper, fan the sheets first and tap the stack on a flat surface to even the edges.
 Note: Do not fan or curl photo paper.
Do one of the following:
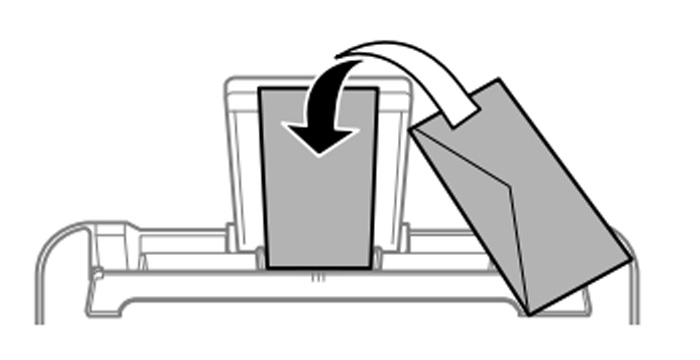
- Insert paper, glossy or printable side up and short edge first, in the center of the paper support.
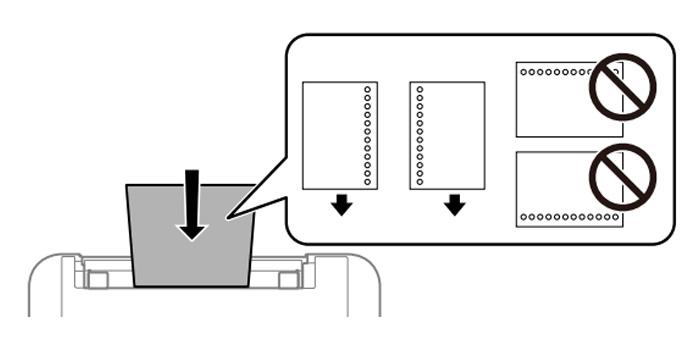
- Load a sheet of loose-leaf or other paper with holes facing as shown
- To load a sheet of paper longer than legal size, close the paper support and flatten the leading edge of the paper as shown

- Slide the edge guides against the paper, but not too tightly. Then flip the feeder guard back.

Always follow these paper loading guidelines:
- Load only the recommended number of sheets.
- Load paper short edge first, no matter which way your document faces.
- Load letterhead or pre-printed paper top edge first.
- Do not load paper above the arrow mark inside the edge guide.
- If you have trouble loading a stack of envelopes, press each envelope flat before loading it or load one envelope at a time.
- Do not load envelopes that are curled, folded, or too thin, or that have plastic windows or exposed adhesive flaps.
- Check the paper package for any additional loading instructions.
- Do not place objects on the feeder guard. Doing so may prevent paper from feeding.
- Do not leave paper in the printer as the paper may curl or the print quality may decline.
- If you use paper with binder holes, load only one sheet at a time in only these sizes: Letter (8.5 × 11 inches [216 × 279 mm]), A4 (8.3 × 11.7 inches [210 × 297 mm]), or Legal (8.5 × 14 inches [216 × 356 mm]).
| Paper type | Loading capacity |
| Plain paper | Letter (8.5 × 11 inches [216 × 279 mm]), A4 (8.3 × 11.7 inches [210 × 297 mm]), Executive (7.25 × 10.5 inches [184 × 267 mm]), Half Letter (5.5 × 8.5 inches [140 × 216 mm]), or A6 (4.1 × 5.8 inches [105 × 148 mm]) size: 100 sheets |
| Copy paper | Legal (8.5 × 14 inches [216 × 356 mm]), 8.5 × 13 inches (216 × 330 mm), Mexico-Oficio (8.5 × 13.4 inches [216 × 340 mm]), or Oficio 9 (8.46 × 12.4 inches [215 × 315 mm]) size: 1 sheet |
| Epson Presentation Paper Matte Epson High Quality Ink Jet Paper |
80 sheets |
| Epson Premium Presentation Paper Matte Epson Photo Paper Glossy Epson Premium Photo Paper Glossy Epson Ultra Premium Photo Paper Glossy Epson Premium Photo Paper Semi-gloss Epson Value Photo Paper Glossy |
20 sheets If paper feeds incorrectly, or printing is uneven or smeared, load 1 sheet at a time. |
| Epson Premium Presentation Paper Matte Double-sided |
1 sheet |
| Envelopes | 10 envelopes |
You can print double-sided on the paper types and sizes listed here.
| Paper type | Size | Double-sided printing capacity |
| Plain paper | Letter (8.5 × 11 inches [216 × 279 mm]), A4 (8.3 × 11.7 inches [210 × 297 mm]), Executive (7.25 × 10.5 inches [184 × 267 mm]), Half Letter (5.5 × 8.5 inches [140 × 216 mm]), or A6 (4.1 × 5.8 inches [105 × 148 mm]) | 30 sheets |
| Copy paper | Legal (8.5 × 14 inches [216 × 356 mm]), Mexico-Oficio (8.5 × 13.4 inches [216 × 340 mm]), 8.5 × 13 inches (216 × 330 mm), Oficio 9 (8.46 × 12.4 inches [215 × 315 mm]), or User-defined sizes | 30 sheets |
| Epson Premium Presentation Paper Matte Double-sided | Letter (8.5 × 11 inches [216 × 279 mm]) | 1 sheet |
You cannot print double-sided on the following paper types:
- Epson High Quality Ink Jet Paper
- Epson Presentation Paper Matte
- Epson Photo Paper Glossy
- Epson Value Photo Paper Glossy
- Epson Premium Photo Paper Glossy
- Epson Premium Photo Paper Semi-gloss
- Epson Ultra Premium Photo Paper Glossy
- Epson Premium Presentation Paper Matte
- Envelopes
Compatible Epson L3210 Papers
You can purchase genuine Epson ink and paper from an Epson authorized reseller. To find the nearest reseller, visit latin.epson.com or call your nearest Epson sales office.
Borderless Paper Type Compatibility
You can print borderless photos on compatible paper types in compatible sizes:
Borderless Paper Types
- Epson Premium Photo Paper Glossy
- Epson Ultra Premium Photo Paper Glossy
- Epson Photo Paper Glossy
- Epson Premium Photo Paper Semi-gloss
- Epson Value Photo Paper Glossy
Borderless Paper Sizes
4 × 6 inches (102 × 152 mm)
Parent topic: Loading Paper
Download Epson L3210 Driver for windows and Mac
Download Epson L3210 User manuals pdf file.
| For this paper | Select this paper Type or Media Type setting |
| Plain paper Copy paper Epson Presentation Paper Matte Epson High Quality Ink Jet Paper |
Plain Paper / Bright White Paper |
| Epson Ultra Premium Photo Paper Glossy | Ultra Premium Photo Paper Glossy |
| Epson Premium Photo Paper Glossy | Premium Photo Paper Glossy |
| Epson Photo Paper Glossy Epson Value Photo Paper Glossy |
Photo Paper Glossy |
| Epson Premium Photo Paper Semi-gloss | Premium Photo Paper Semi-Gloss |
| Epson Premium Presentation Paper Matte Epson Premium Presentation Paper Matte Doublesided |
Premium Presentation Paper Matte |
| Envelopes | Envelope |
Placing Originals on the Scanner Glass
You can place originals up to this size on the scanner glass: Letter (8.5 × 11 inches [216 × 279 mm]) or A4 (8.3 × 11.7 inches [210 × 297 mm]).
- Open the document cover.
 Note: If there is any dust or dirt on the scanner glass, the scanning range may expand to include it, so the image of the original may be displaced or reduced. Remove any dust and dirt on the scanner glass before scanning.
 - Place your original facedown on the scanner glass with the top facing into the corner. Slide the original to the edges of the indicated corner.
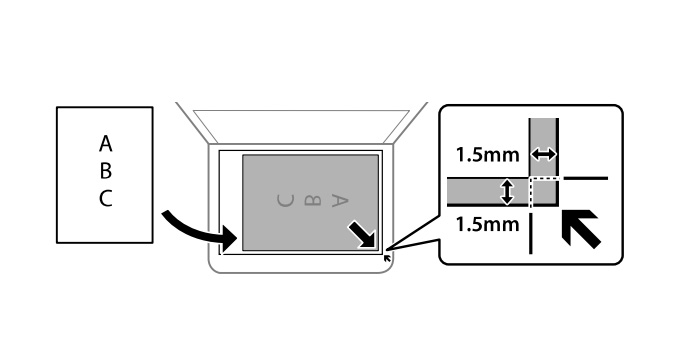 Note: You can place multiple originals on the scanner glass. Just make sure they are at least 0.2 inch (4.5 mm) away from the edge of the scanner glass and at least 0.8 inch (20 mm) away from each other.
Note: The edges of your original may be cropped by 0.06 inch (1.5 mm) from the edge of the scanner glass. Manually position your original away from the edges to prevent cropping.
Note: When placing bulky originals such as books, prevent exterior light from shining directly onto the scanner glass. - Close the document cover gently to keep your original in place.
Related Article
The MAN TGX 2016 Efficiency in long-haul transport
How To Setup, Install Ink Cartridges, Copying, and Scanning Epson XP-7100
User Manual Epson EcoTank ET-2800 Wireless Color All-in-One Cartridge-Free Supertank Printer with Scan and Copy