How To Setup, Install Ink Cartridges, Copying, and Scanning Epson XP-7100
Epson XP-7100 Replacing Ink Cartridges
When an ink cartridge is expended, you need to replace it. You may also need to replace a cartridge that is more than six months old, or if your printouts do not look their best, even after cleaning and aligning the print head.
Note: Please dispose of your used Epson branded ink cartridges responsibly and in accordance with local requirements. If you would like to return your used ink cartridges to Epson for proper disposal, please go to epson.com/recycle for more information.

Epson XP-7100 Removing and Installing Ink Cartridges
Make sure you have your replacement cartridges handy before you begin. You must install new cartridges immediately after removing the old ones.
Caution: Leave your old cartridges in the printer until you are ready to replace them to prevent the print head nozzles from drying out. Do not open ink cartridge packages until you are ready to install the ink. Cartridges are vacuum packed to maintain reliability.
- Make sure that the CD/DVD tray is not inserted.
- Turn on your product. If an ink cartridge is expended, you see a message on the LCD screen. Note which cartridges need to be replaced, select Next, and select Yes, replace now. If you are replacing a cartridge before you see a message on the LCD screen, select Maintenance > Ink Cartridge Replacement. Select Next and select Start.
- Lift up the scanner unit.
 Caution: Do not move the print head by hand; otherwise, you may damage your product. Do not touch the flat white cable or the metal bar inside the product.
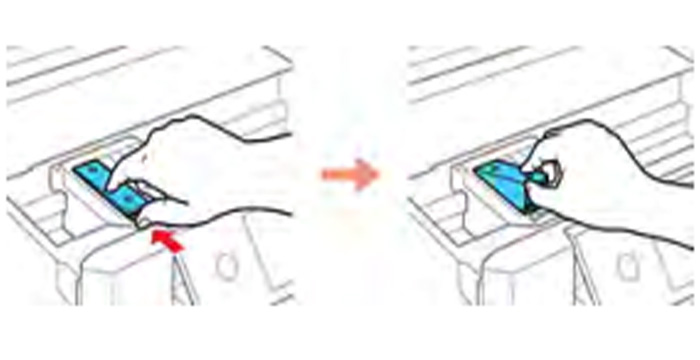
- Push in the blue tab to unlock the ink cartridge you are replacing. Then lift the ink cartridge as shown to remove it.
 Warning: If ink gets on your skin, wash it thoroughly with soap and water. If ink gets into your eyes, flush them immediately with water. If ink gets into your mouth, spit it out and see a doctor right away.
 - Recap the used ink cartridge using the cap that came with it. You can also use the cap from your replacement cartridge package.
 Note: Dispose of used cartridges carefully. Do not take the used cartridge apart or try to refill it.
 - If you are replacing the black ink cartridge, gently shake the new black ink cartridge four or five times. Do not shake the color ink or photo black cartridges.
- Remove the new ink cartridge from the package.
 Caution: Do not touch the areas shown here. Doing so may prevent normal operation and printing.
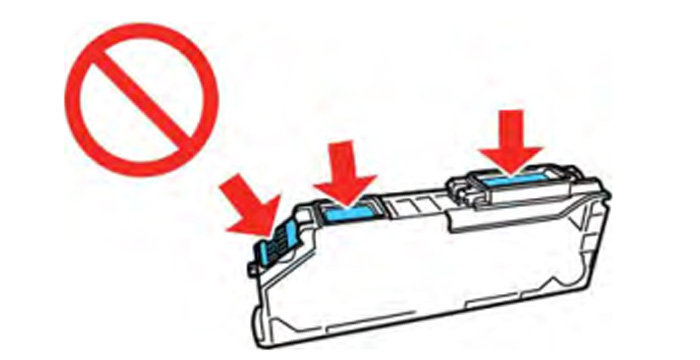
- Remove the cap from the cartridge and save the cap so you can recap ink cartridges before storing or disposing of them.
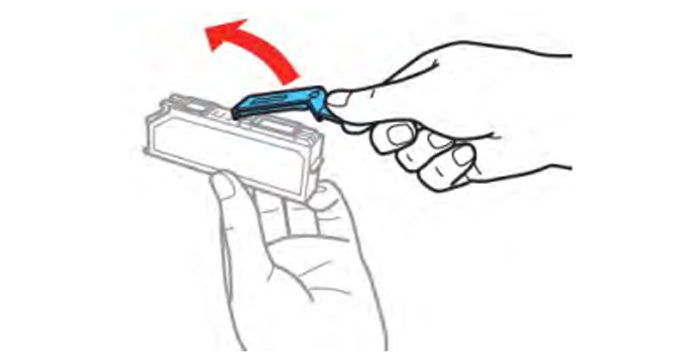 Caution: Do not remove any other labels or seals, or ink will leak.
 - Insert the ink cartridge at a slight angle into the ink cartridge holder as shown. Then press the ink cartridge all the way down as shown until it clicks into place.

- After you replace all the cartridges that need replacing, close the scanner unit and select Completed on the LCD screen. The print head moves to its home position and the product starts charging the ink. This takes a few minutes. When you see a completion message on the LCD screen, ink replacement is complete. Note: If you see an error screen telling you an ink cartridge is installed incorrectly, lift up the scanner unit and press the ink cartridge down until it clicks into place. When you're finished, close the scanner unit.
Caution: Do not turn off the product while ink is charging or you may not be able to print. If you remove an ink cartridge for later use, recap the ink cartridge using the cap that came with it to prevent the ink from drying out and to protect the surrounding area from getting smeared by ink. Store the ink cartridge in the same environment as the product. Do not leave the product with the ink cartridges removed for an extended period of time. Otherwise, ink remaining in the print head nozzles may dry out and you may not be able to print.
Printing with Expended Color Cartridges - Windows
If you see a message during printing telling you that you can temporarily print in black ink with an expended color or photo black cartridge, you can cancel your print job and select settings to print on plain paper or on an envelope.
Note: If you are using your Epson product with the Windows 10 S operating system, you cannot use the software described in this section. You also cannot download and install any Epson product software from the Epson website for use with Windows 10 S; you must obtain software only from the Windows Store. To use this feature, Epson Status Monitor must be enabled.
- Click Cancel or Cancel Print to cancel your print job. Note: If the message screen appears on another computer on a network, you may need to cancel the print job using the product control panel.
- Load plain paper or an envelope in your product.
- Access the print settings in your print application.
- Click the Main tab and make sure Borderless is not selected.
- Select Plain Paper/Bright White Paper or Envelope as the paper type setting.
- Select the Black/Grayscale checkbox.
- Click OK.
- Print your document. Epson Status Monitor 3 displays a print message.
- Click Print in Black to print your document.
Printing with Expended Color Cartridges - Mac
If printing stops, you can cancel your print job and select settings to temporarily print with only black ink on plain paper or on an envelope.
- Click the printer icon in the Dock.
- If you see a message telling you that you can temporarily print with only black ink, click the Delete or X button to cancel your print job. If you see an error message, click OK. Note: If the message screen appears on another computer on a network, you may need to cancel the print job using the product control panel.
- In the Apple menu or the Dock, select System Preferences.
- Select Print & Fax, Print & Scan, or Printers & Scanners, select your product, and select Options & Supplies.
- Select Driver or Options. You see a screen like this:

- Select On as the Permit temporary black printing setting.
- Click OK.
- Close the utility window.
- Load plain paper or an envelope in your product.
- Access the print settings in your print application.
- Select Print Settings from the pop-up menu.
- Select Plain Paper/Bright White Paper or Envelope as the paper type setting.
- Select the Grayscale option.
- Click Print to print your document.
Epson XP-7100 Adjusting Print Quality
If your print quality declines, you may need to run a utility to clean or align the print head.
Note: If you are using your Epson product with the Windows 10 S operating system, you cannot use the software described in this section. You also cannot download and install any Epson product software from the Epson website for use with Windows 10 S; you must obtain software only from the Windows Store.
If running these utilities does not solve the problem, the translucent film inside the printer may be smeared or you may need to replace the ink cartridges.
Epson XP-7100 Print Head Maintenance
If your printouts become too light, or you see dark or light bands across them, you may need to clean the print head nozzles. Cleaning uses ink, so clean the nozzles only if print quality declines. You can check for clogged nozzles before you clean them so you don’t clean them unnecessarily.
Note: You cannot clean the print head if an ink cartridge is expended, and may not be able to clean it when a cartridge is low. You must replace the cartridge first. Download Epson Expression Premium XP-7100 User's Guide PDF.
Related Article
The MAN TGX 2016 Efficiency in long-haul transport
User Manual Epson EcoTank ET-2800 Wireless Color All-in-One Cartridge-Free Supertank Printer with Scan and Copy
User's Guide Epson EcoTank ET-3850 Wireless Color All-in-One